
Agile software development delivers quick business value and at the same time remains flexible to the core, as opposed to its traditional alternative, the waterfall model. Agile involves unconventional, bottom-up, entrepreneurial and locally optimized project groups empowered to make decisions that are the best fit for individual projects. For greater design effectiveness, complexity control and efficient task scheduling in these environments, practitioners benefit from being familiar with three Lean Six Sigma tools: the quality function deployment, the design structure matrix and the visual control board.
An Agile Challenge
Agile, a complex and dynamic environment, specifically gives rise to three primary concerns, as compared to conventional projects:
- The ability to stay focused on business or customer value and not the product or processes, while aligning and transforming customer needs to software and projects.
- The little time available within each iteration to complete a complex requirements dependency map and schedule use case.
- Micromanaging daily or hourly assigned tasks in every cycle of iteration, with little room for slippage and risk mitigation.
Tools Provide the Solution
What best fits this culture of non-IT firms is simple tool-based value creation or productivity improvement, rather than complying with a set of processes. To approach resolving the agile-specific challenges , here are the three effective tools picked up from an agile project manager’s tool kit for unconventional environments:
- Quality function deployment – This relates to the first principle of Lean thinking: identifying the customer and the customer’s value. It aids in aligning and transforming customer needs to design or codes.
- Design structure matrix – Value stream mapping every activity of customer value and eliminating waste from processes is the next principle of Lean. This tool aids in the pre-design dependency mapping and complexity management.
- Visual control board – Flow and pull, eliminating all information or material-flow bottlenecks and allowing critical information to flow upstream, is the next Lean maturity level. This board allows practitioners to micromanage daily and hourly tasks with improved visibility and teamwork.
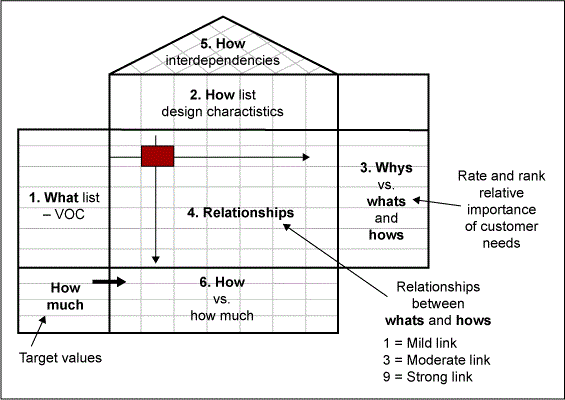
Quality Function Deployment
In software development, a quality function deployment (QFD) works through four stages of transformation. Each stage is called a house of quality. This is the transformation flow from “customer wants” to “product specifications”:
- Product house of quality involves translating what the customer wants, described in their language, into a list of prioritized product or service design requirements in the company’s language which describes how the product works. It also compares the company’s performance with its competitors, and sets targets for improvement to differentiate their products from competitor products or services.
- Part design house of quality translates product specifications (the design criteria from Step 1) into part characteristics. Some sample part characteristics are number of simple object access protocol (SOAP) services, Java classes and input/output performance requirements.
- Development process house of quality translates and aligns part characteristics (from Step 2) into optimal process characteristics, such as automation, compilers and web servers, that maximize the ability to deliver the best quality product as expected by the customers.
- Project management house of quality translates process characteristics into project delivery or project management methods that will optimize an organization’s ability to deliver the best quality in the most efficient manner. These methods include waterfall, agile, the scrum tool set and risk management.
Benefits of Using Quality Function Deployment
Benefit 1: QFD enables flexible IT projects to remain directly aligned to voice of the customer (VOC) and allows for a flawless transformation of VOC into design parameters and project parameters. Continuous prioritization of customer requirements enables organizations to focus on the development items and activities that are linked to the highest customer value through relative ranking and weighting of requirements.
Benefit 2: Interdependency and correlation between requirements at every house (the top triangular section in Figure 1) and critical design decisions can be taken easily and quickly using QFD.
Benefit 3: On the same QFD worksheet at every house, it is possible not only to compare requirements and design features with standards and internal targets, but also to benchmark project values with those of the best in the market or those of competitors.
Design Structure Matrix
A design structure matrix (DSM) provides a simple, compact and visual representation of a complex system that supports innovative solutions to decomposition and integration problems. The advantages of DSMs in alternative system representation and analysis techniques have led to their increasing use in a variety of contexts, including product development, project planning and project management. There are four DSM applications:
- Component-based, or architecture, which is useful for modeling system component relationships and facilitating appropriate architectural decomposition strategies
- Team-based, or organization, which is beneficial for designing integrated organization structures that account for team interactions
- Activity-based, or schedule, which is advantageous for modeling the information flow among process activities
- Parameter-based, or low-level schedule, which is effective for integrating low-level design processes based on physical design parameter relationships
In a nutshell, DSM is a complexity management pre-design tool. Using it requires completing an initial base step, and then following one of two management steps:
Drawing the base DSM – This process begins with building a given requirements dependency map, sometimes called a spaghetti graph (Figure 2). Any project task, product design or requirement elements can be represented in this graph, which clearly depicts the inter-relationships between the items, known as the complexity of the engagement. Arrows represent flow of information and its direction. This diagram shows the total complexity of the engagement and sets up the basis for drawing the DSM. In Figure 2, all information flows out of B, hence B is a pure driver item. Element I, however, is only influenced by other elements; therefore, it is a perfectly dependent item.
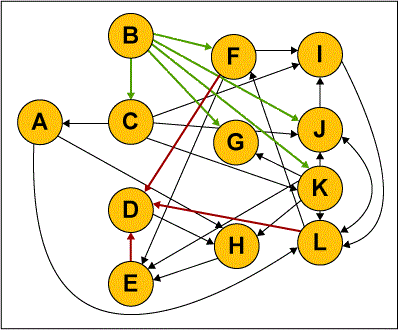
Next, it is possible to convert the elements of the spaghetti graph into a base DSM (Figure 3). The work items (as per the initial sequence) are listed across the X and Y axes, and dots are used to represent dependency. For example, A depends on C, but A has been scheduled before C, which is not feasible. Any dots above the diagonal line are not feasible or preferred. Hence, the objective is to minimize those downstream dependencies.
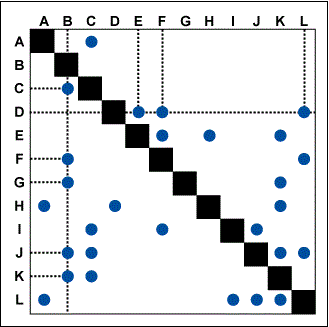
DSM Partitioning –The base DSM provides the initial sequence of the customer’s requirements. But the requirement items and features A to L must still be shuffled to minimize dependency above the diagonal line. After being re-sequenced, the dependency dots will come closer to the diagonal line, and then it is possible to start partitioning the DSM. Although practitioners cannot proceed in a sequenced manner with dots above the diagonal line, they may partition the whole DSM into square boxes. This allows them to see a group of dots as single item or as a small project with parallel or coupled work streams (Figure 4).

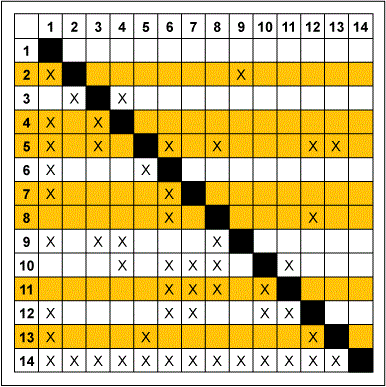
DSM Banding –This is an alternative to DSM partitioning. Based on the product complexity, team structure, location, available time and other parameters, practitioners may choose one of these two operations. DSM banding is used for segmenting the activity flow into various parallel or concurrent bands or levels. Each band consists of grouping activities or development items into sequences that are not dependent on each other for information (Figure 5). In this DSM, white and yellow bands are independent items, which construct the critical path of the project. For example, items 7 and 8 do not wait for each other to receive the information flow, and therefore they are on the same band. The lesser the number of bands, the less concurrency and complexity there is in the project.
Benefits of Using Design Structure Matrix
Benefit 1: DSM simplifies a project’s complexity and enables visible profiling of interdependencies and information flow.
Benefit 2: DSM – partitioning or banding – makes it easy to decide the number of iteration cycles based on the critical path, as well as the items that should go into each cycle.
Benefit 3: DSM transforms an apparently sequential design with hidden dependency and a complex flow of steps or information into a concurrent, independent, manageable set of items, requirements or design elements.
Visual Control Board
A visual control board is a highly effective but less practiced tool for ground level project tracking and scheduling. It is recommended for an iterative software or product development environment, because it is dynamic and flexible with business demands.
Table 1 is a simple example of a visual control board for a hypothetical team of five people developing a complex software solution. It is a simple task-entry mechanism against each team member on the calendar. Each box represents the task element (E) and the percentage of target completion on that calendar date. The last entry represents the percentage of actual completion by the end of the day. As the name suggests, it is not a document; it is drawn on a visual board in the middle of an office so that every stakeholder may visit it at any time for the latest status, performance comparison, re-scheduling needs, target reset needs and other utilities.
| Table 1: Sample Visual Control Board | ||||
| Team Member | Aug. 6, 2007 | Aug. 7, 2007 | Aug. 8, 2007 | Aug. 9, 2007 |
| John | E1 – 20 percent – 10 percent | E1 – 20 percent – 10 percent | E1 – 20 percent – | E1 – 20 percent – |
| Martin | E2 – 50 percent – 40 percent | E2 – 50 percent – 40 percent | E2 – 100 percent – | E2 – 100 percent – |
| Simon | E3 – 80 percent – 100 percent | E1 – 20 percent – 20 percent | E3 – 80 percent – | E3 – 80 percent – |
| Kevin | E4 – 40 percent – 50 percent | E4 – 40 percent – 50 percent | E8 – 10 percent – | E8 – 30 percent – |
| Jean | E5 – 100 percent – 40 percent | E5 – 60 percent – 60 percent | E7 – 20 percent – | E7 – 20 percent – |
The actual percentages are put in by the team members, which makes them even more responsible. To understand the power of a visual control board, take the case of Simon, who was given a target of completing 80 percent of E3 on Aug. 6. He actually finished all of E3 on that day, whereas John could not meet his target for E1 on Aug. 6. Hence, with a visual control board, it is a simple decision to assign E1 to Simon on Aug. 7 alongside John. This way the team may remain on schedule on that task element despite John’s slow progress on the previous day.
Benefits of Visual Control Board
Benefit 1: Allows for visible progress tracking and resetting targets as per an individual performance trend.
Benefit 2: Creates a competitive and empowered environment in the workplace, with quick decision making and team collaboration.
Benefit 3: For a sizeable team with many independent development and design task items and elements and a short release cycle, the visual control board is the best fit. It enables team members to set and review daily targets. It also helps with continuous productivity growth and leverages that growth to beat constraints, risks and delays in order to meet schedule commitments.
Tool Set for Quick Reference
The information in Table 2 provides a quick summary of the practitioners who will find these tools most valuable.
| Table 2: Agile Tool Set Audience and Applicability | ||
| Tool | Audience | Applicability |
| Quality function deployment | Development team, business analysts, design leads |
|
| Design structure matrix | Development team, IT systems consultants and managers, architects or re-engineering teams |
|
| Visual control board | Development teams, scrum masters, agile project leads |
|
Applying the Toolset Benefits
This is a too set for improved design effectiveness, complexity control and efficient task scheduling in agile development environments. The quality function deployment, design structure matrix and visual control board each have their own strengths, and knowing the benefits of all three will allow practitioners to use the right tool in the right situation.